Introduction
For most administrators out there, having the ability to login to their servers securely with SSH public/private key pairs is a must. But did you know there is a way to make that process even more resilient? With the help of PAM or Pluggable Authentication Module, you can actually enable 2FA on your ssh key pairs, making the login process just that more guarded against outside attacks.
To those that don’t know what 2FA or 2-factor Authentication is, 2FA is a process of authenticating to a system using a combination of factors. These factors of authentication are broken down as such:
- Something you know, like a password or security question.
- Something you have, like a security token (or in our case, an authenticator app).
- Something you are, like your fingerprint or voice.
The reasoning behind this is that the attacker would have to have multiple things in order to login to the systems, making the chance of a malicious login less likely.
In this article, we’ll go over how to enable SSH authentication using the OATH-TOTP protocol, an open protocol that generates a one-time password over a specified time range, in this case roughly every 30 seconds.
Prerequisites
To follow along, you’ll need:
- A Linux server with a non-root sudo user. In my case, I’ll be using Rocky Linux 9
- A smart-phone or tablet that has an OATH-TOTP authenticator app installed, such as FreeOTP+ or Google Authenticator.
Installing Google Authenticator PAM
In this section, we are going to need to install and configure Google’s Authenticator PAM.
To start, its always best to update your repositories:
sudo dnf update -y
Next, install the PAM:
sudo dnf install google-authenticator qrencode -y
After the application installs, its time to configure google-authenticator to generate OTP codes. To do so, run in the terminal
google-authenticator
It will then ask you a few questions, which can be answered with the default of yes (y), unless you need to configure it different.
Do you want authentication tokens to be time-based (y/n) y
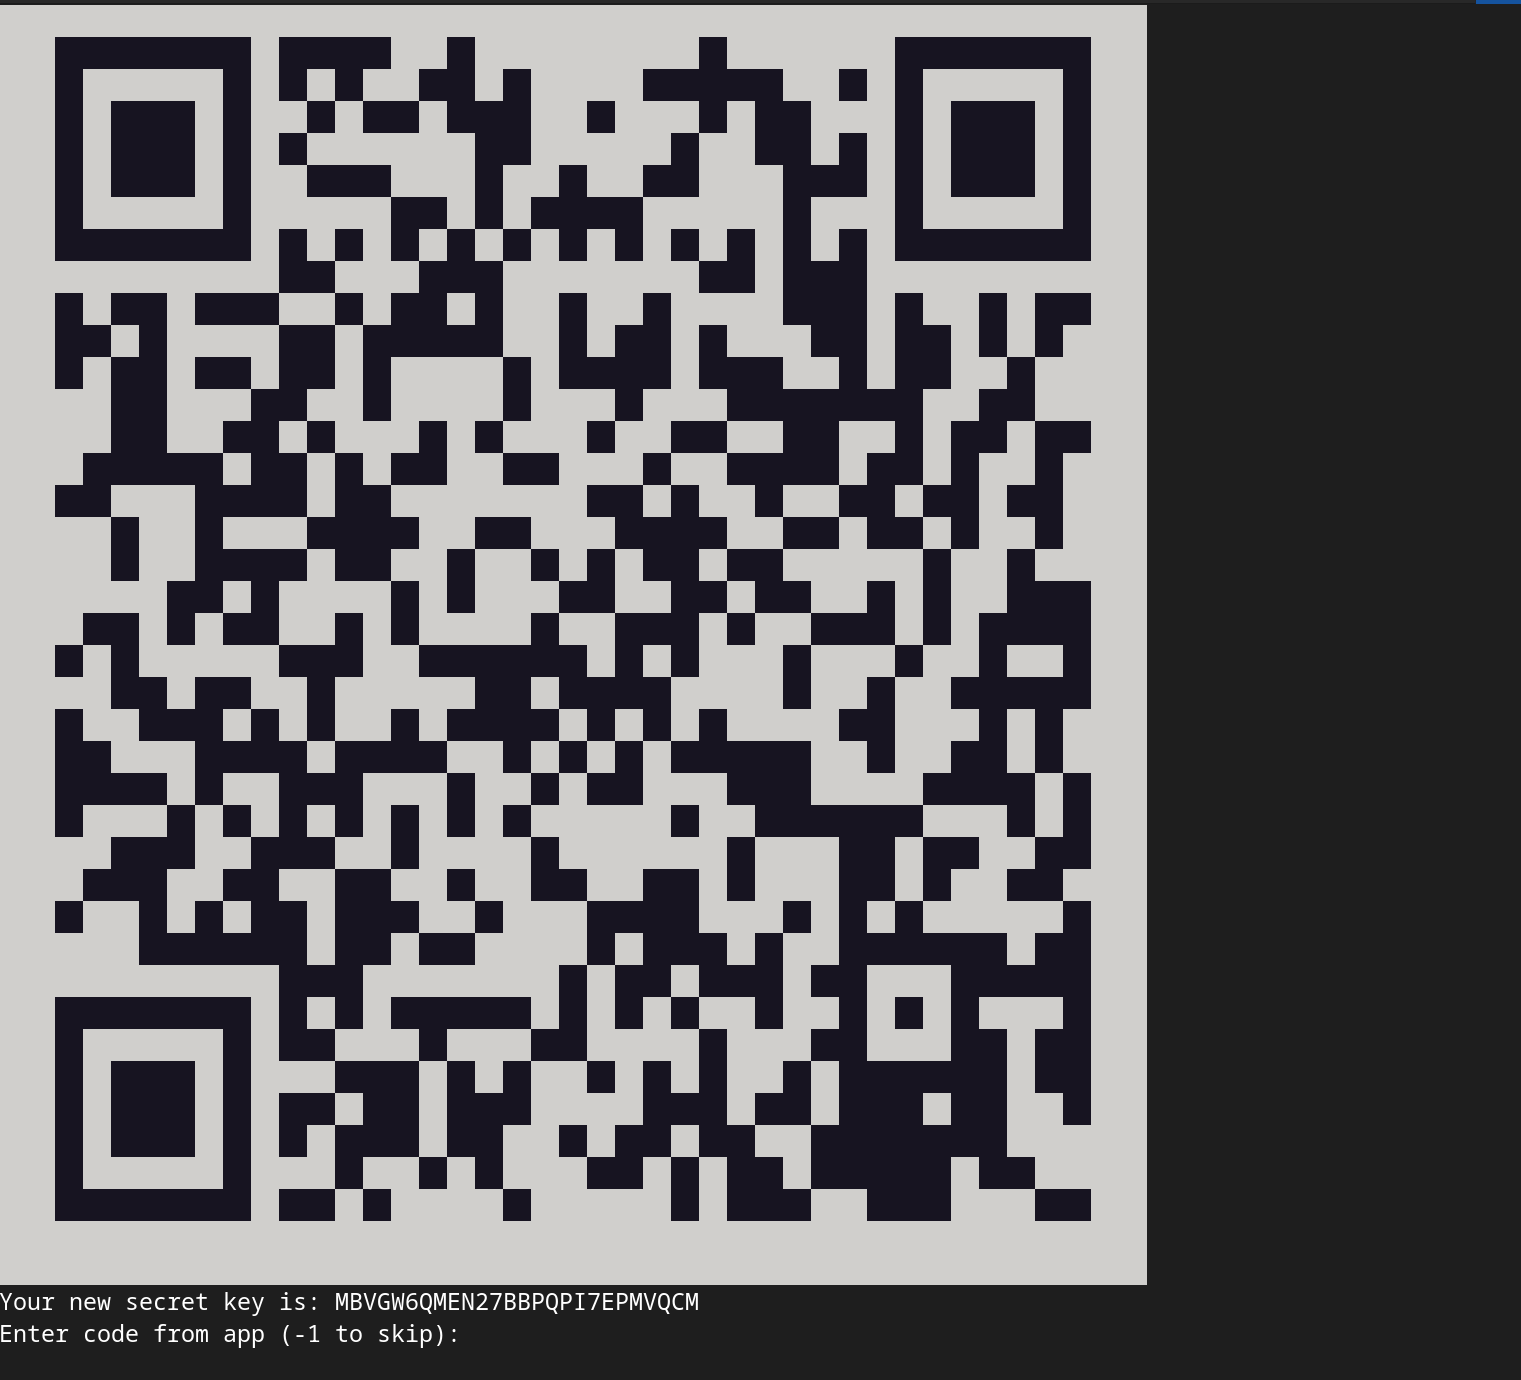
Go ahead and scan the QR code that is generated on the terminal into you authenticator app. The app on your phone will then generate a code, usually a set of 6 digits. Enter that code back into the terminal, which it will respond back with a set of recovery codes. Copy those codes into a safe place, like a password manager. Finally, answer the rest of the questions to finish the configuration.
Do you want me to update your "/home/user/.google_authenticator" file? (y/n) y

Do you want to disallow multiple uses of the same authentication
token? This restricts you to one login about every 30s, but it increases
your chances to notice or even prevent man-in-the-middle attacks (y/n) y

By default, a new token is generated every 30 seconds by the mobile
app. In order to compensate for possible time-skew between the
client and the server, we allow an extra token before and after the
current time.[...] Do you want to do so? (y/n) y

If the computer that you are logging into isn't hardened against brute-force
login attempts, you can enable rate-limiting for the authentication module.
By default, this limits attackers to no more than 3 login attempts every 30s.
Do you want to enable rate-limiting? (y/n) y
Configuring SSH for OTP
Now we need to configure SSH to prompt for the OTP password. To do this we need to edit the /etc/pam.d/sshd using your favorite text editor.
sudo vi /etc/pam.d/sshd
Add this line to the end of the file
auth required pam_google_authenticator.so
Next, we need to edit the /etc/ssh/sshd_config file
sudo vi /etc/ssh/sshd_config
Search for and change the line ChallengeResponseAuthentication no to ChallengeResponseAuthentication yes. This will allow for the OTP code prompt to apear after a successful SSH key authentication.
ChallengeResponseAuthentication yes
Also we need to find KbdInteractiveAuthentication and change its response to yes. The older alias for this, ChallengeResponseAuthentication is depricated and no longer used.
KbdInteractiveAuthentication yes
AuthenticationMethods publickey,keyboard-interactive
The last item in the SSH config that needs to be changed is for the AuthenticationMethods alias. We need to let this option know about the SSH key pair with publickey and about the OTP code with keyboard-interactive. Add this line to the bottom of the config.
AuthenticationMethods publickey,keyboard-interactive
Finally, we need to restart the SSH daemon
sudo systemctl restart sshd
If you do not get any errors, go ahead and open another terminal and try to ssh to the host. You should be prompted to enter in the code from your 2FA app of choice. After you enter the code, it should land you at the bash prompt.
Conclusion
Congrats! You’ve successfully enabled 2FA on SSH. With this enabled, your servers are just that more secure. If you have any issues, please feel free to check out the troubleshooting section to see if there is anything that can help you. If you’ve enjoyed this, please check out some of my other articles.
Troubleshooting
DNF: google-authenticator No matches found
If you run into an issue of dnf not finding the google-authenticator package, Rocky 9 might not have the epel-release repository enabled.
To verify, you can run:
sudo dnf repolist
If the epel repository is not in the list, then you can continue on.
To use the EPEL, the CRB repository must be enabled. To enable the CRB repository, run
sudo dnf config-manager --set-enabled crb
Next, view the /etc/yum.repos.d/rocky.repo and look under the [crb] listing. Check to see that enabled=1 is present and uncommented.
After that, update the repository
sudo dnf update -y
If you did not get any issues or errors, you should now be able to install the EPEL
sudo dnf install epel-release
Finally with that installed, go ahead and search for the google-authenticator package
dnf search google-authenticator
SELinux: google_authenticator-* access denied
If your system is running SELinux, then you might run into an issue with using the google-authenticator PAM module as it creates a temporary file used in authentication. SELinux blocks this by default because the google-authenticator module does not have the permission granted by SELinux policies to create files in the users home directory. There are two ways to solve this:
- Create a new directory and give that the necessary SELinux permissions
- Place the
.google_authenticatorfile into the.sshdirectory. Runrestoreconon the directory to get the correct permisions. Finally edit the pam config file to point to the new directory.
In this troubleshooting section, we’ll be going with the second option.
First, move the .google_authenticator file into the .ssh directory
mv .google_authenticator ~/.ssh/google_authenticator
Next set the necessary permissions
restorecon -Rv .ssh/
Finally, edit the /etc/pam.d/sshd configuration file to point to the new location of the authenticator file.
pam_google_authenticator.so secret=~/.ssh/google_authenticator
Once this is done, try logging in from a new terminal. You should be able to enter in your code from the 2FA app of your choice and be able to login with SELinux enabled.
References
- https://www.redhat.com/sysadmin/mfa-linux
- https://www.digitalocean.com/community/tutorials/how-to-set-up-multi-factor-authentication-for-ssh-on-ubuntu-18-04
- https://wiki.rockylinux.org/rocky/repo/#community-approved-repositories
- https://github.com/google/google-authenticator-libpam/issues/93
- https://bugzilla.redhat.com/show_bug.cgi?id=1840113