Introduction
Ever since getting certified in Azure (az-900), I’ve been wanting to look into the DevOps field a little bit more. Specifically, on the cloud platform I’ve been certified in, Azure. It was then I remembered at Christmas my parents got me the book Learning Devops: Second Edition by Mikael Krief. When I got the book I didn’t have the time to fully read it, but lately I’ve been able to sit down and do so. This book, albeit a bit old, still has some good information about the field as a whole. In short, this book covers all of the important tools used in DevOps today. A small taste as to what’s covered is Terraform, Docker, Kubernetes, Git, Jenkins and much more. And the best part of this book is that all of the examples use Azure in some way or form, which is fantastic!
So, my plan is to write a post, or in this case a “Day”, covering what a single chapter covers. This way I can reflect on what I’ve learned and I get to summarize it in my own words. Also, since this book is almost 3 years old, there are bound to be errors or issues that I’ll end up running into. These posts will be a handy place to put all of the reference material that I’ve used when I get stuck. If you want to follow along with me, you can go ahead and grab the book from Amazon or from Packt themselves. None of these links are sponsered, I’m just really enjoying this book :)!
Terraform
Ok, so these book starts out with Terraform. That’s right, the tool that is always placed at the end of every Udemy DevOps course, is at the beginning. But don’t fret, its actually not that hard. Now to make it easier to understand and appreciate you will need some familarity with a cloud platform. Now, you don’t need to go out a get a certification or anything, but you should be able to move around the Azure Portal with some know-how. In the book and as I’ve stated at the beginning, the cloud platform of choice is Azure. So if you haven’t made a free account with Azure, I recommend you do so.
Next, to install Terraform you can head over to HashiCorp’s Install Terraform page. There you can find instructions on how to install Terraform for your operating system.
Finally, the last thing we’ll need to install is either Azure CLI if you’re on Linux/Mac or Azure Powershell if you’re on Windows. You’ll then need to login to Azure through the cli tool of your choice. For Azure CLI, the command would be:
az login
With that out of the way, lets look at an example of terraform code. This code comes directly from my GitHub repo for this book. This code is located under the ch2 directory.
versions.tf
terraform {
  required_providers {
    azurerm = {
      source  = "hashicorp/azurerm"
      version = "3.109.0"
    }
  }
}

provider "azurerm" {
  features {}
}
To start, you are going to need to let Terraform know what providers you are going to use with your code. In our case, we need the azurerm provider. This provider interacts directly with the Azure Resource Manager through one of the CLIs (Azure CLI or Azure Powershell) depending on your OS. If you need to add extra features or configuration options for the provider, you would do so on the line labeled features. Since there is nothing we need to configure here, we can just place empty curly braces {}. If you’re wondering where I got this information about the azurerm provider, that would be in the Terraform Registry

Next, lets take a look at how we can contain our project by creating a Resource Group for it.
rg.tf
resource "azurerm_resource_group" "rg" {
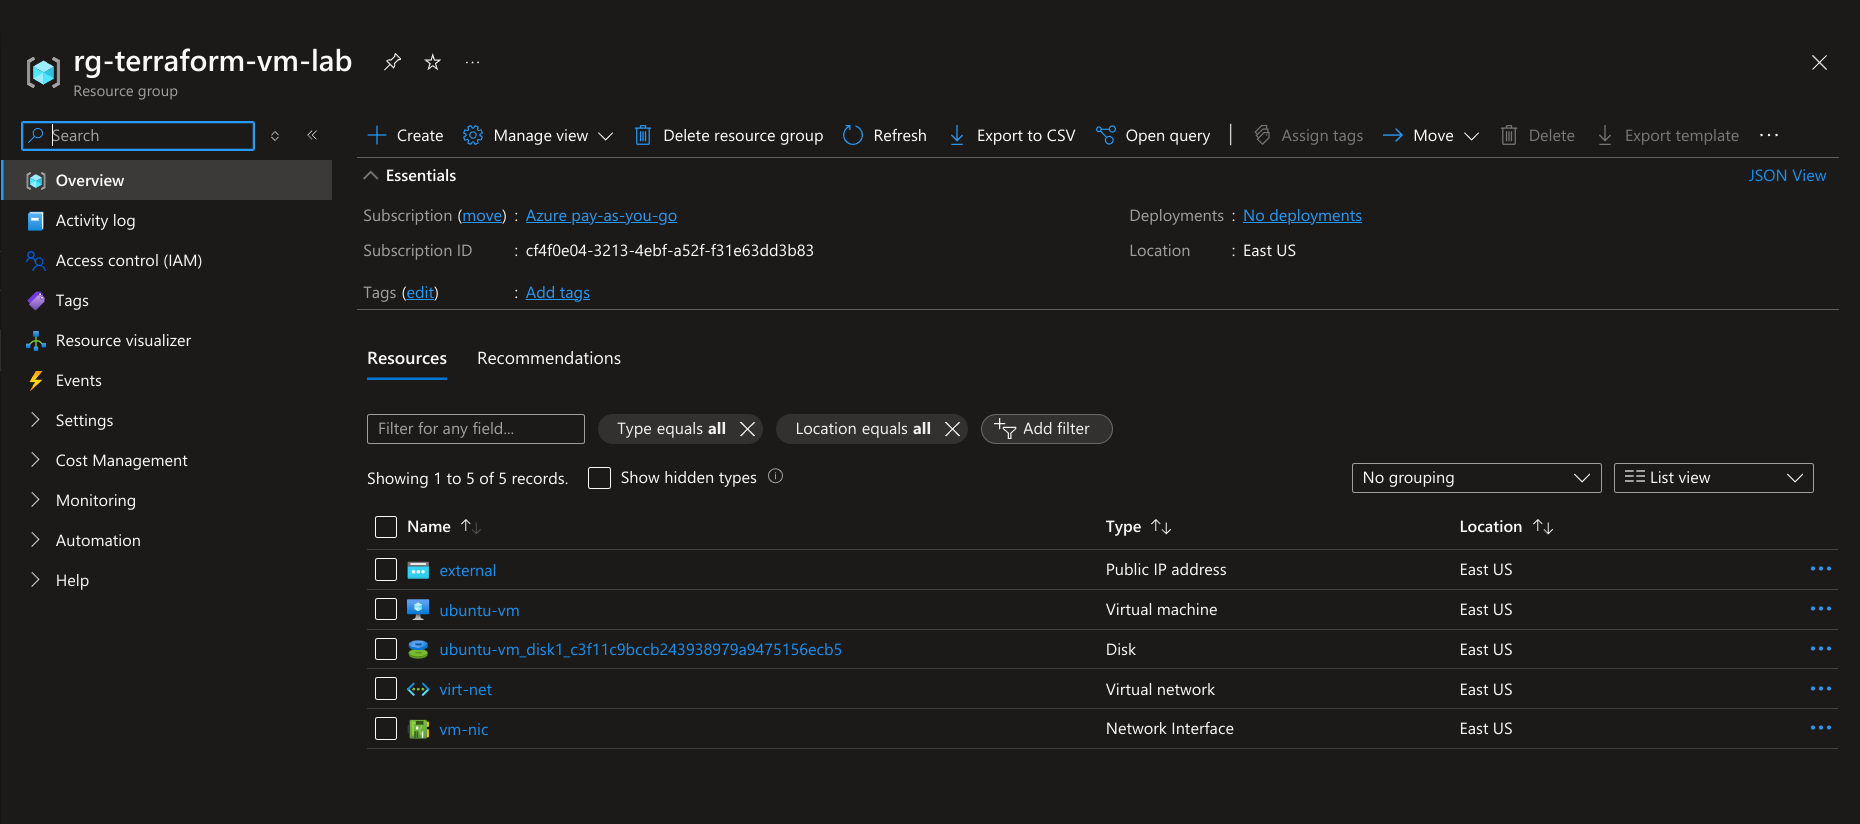
name = "rg-terraform-vm-lab"
location = "East US"
}
To start, the common structure of a Terraform script are called “blocks”. In this case, a resource block is defined at the top of the page. Next comes two strings known as the resource type and the resource name. In the case of our code here, those would be labeled azurerm_resource_group and rg, respectively. Underneath the block, surrounded by curly braces {} are the arguments for that specific resource. In the case of our resource group block, we just need to define the name and the location of our resource group.
With a basic introduction of Terraform code out of the way, lets move on to configuring the network
network.tf
resource "azurerm_virtual_network" "vnet" {
  name                = "virt-net"
  address_space       = ["10.0.0.0/16"]
  location            = azurerm_resource_group.rg.location
  resource_group_name = azurerm_resource_group.rg.name
}

resource "azurerm_subnet" "subnet" {
  name                 = "internal"
  resource_group_name  = azurerm_resource_group.rg.name
  virtual_network_name = azurerm_virtual_network.vnet.name
  address_prefixes     = ["10.0.11.0/24"]
}

resource "azurerm_public_ip" "pip" {
  name                = "external"
  location            = azurerm_resource_group.rg.location
  resource_group_name = azurerm_resource_group.rg.name
  allocation_method   = "Static"

  tags = {
    environment = "Production"
  }
}

resource "azurerm_network_interface" "nic" {
  name                = "vm-nic"
  location            = azurerm_resource_group.rg.location
  resource_group_name = azurerm_resource_group.rg.name

  ip_configuration {
    name                          = "internal"
    subnet_id                     = azurerm_subnet.subnet.id
    private_ip_address_allocation = "Dynamic"
    public_ip_address_id          = azurerm_public_ip.pip.id
  }
}
Now, that’s a lot of code! However, if you look at it a little bit, you can start to see some connections as to what is going on. To start, we need to create a virtual network for our VM to live. In this case we create a virtual network named virt-net with and address space of 10.0.0.0/16 and using a pointer to the resource group block, points to both the name and the location of the resource group. We then need to create a subnet of the virtual network, in this case named internal with an address prefix of 10.0.11.0/24. After that we optionally declare the public IP address of our machine so we can access it ourside of Azure. Finally, we need to configure our nic for the VM, which points to both the private ip and public ip address blocks. With that we have configured all the necessary blocks needed for our network.
Finally, we’ll take a look at the block defining our VM.
compute.tf
resource "azurerm_linux_virtual_machine" "vm" {
  name                  = "ubuntu-vm"
  resource_group_name   = azurerm_resource_group.rg.name
  location              = azurerm_resource_group.rg.location
  size                  = "Standard_DS1_v2"
  admin_username        = "ansible"
  network_interface_ids = [azurerm_network_interface.nic.id]

  admin_ssh_key {
    username   = "ansible"
    public_key = file("~/.ssh/azure.pub")
  }

  os_disk {
    caching              = "ReadWrite"
    storage_account_type = "Standard_LRS"
  }

  source_image_reference {
    publisher = "Canonical"
    offer     = "0001-com-ubuntu-server-jammy"
    sku       = "22_04-lts"
    version   = "latest"
  }
}
Now in this block is where it differs slightly from the book as it uses the azurerm_linux_virtual_machine block instead of the azurerm_virtual_machine block as the official Terraform documentation for azurerm states. Underneath the block we have the normal pointers to the items we’ve aleady discussed as well as a few other arguments. The one argument that might be a bit difficult to find information on is for storage_image_reference. To find more information on images, you can run:
az vm image list
NOTE: You can also run
az vm image list --allbut this command takes a really long time to get the information.
Running the Terraform Script
Now that we’ve gone through the code, we can attempt to run it. To start we need to init the Terraform files. This creates some necessary files that terraform needs. We do this by running:
terraform init
After initing our code, we can now see what terraform intends to do. Run the command:
terraform plan
If everything looks good from that plan, you can now apply the terraform script. Run the command:
terraform apply
NOTE: you can also run
terraform apply -auto-approveto automatically apply the changes to the infrastructure.
All you need to do is confirm with yes and terraform will take care of the rest. Once terraform has completed, you can see in the Azure portal that the VM is created and is running.
If you want to get the public IP address of your newly created server, you can run:
az vm show -d -g rg-terraform-vm-lab -n ubuntu-vm --query publicIps -o tsv
You can then login to the VM through SSH with the username ansible
Destroying the VM
Now when you’re done with the VM, you can easily clean up the infrastructure. This is the nice part of IaC is that it can be built up and torn down with little difficulty. To clean up the infrastructure run:
terraform destroy
All you have to do is confirm with a yes and you’re good. See, easy!
NOTE: You can also append
-auto-approveto the command to skip the confirmation.
Wrapping it up
Overall, this chapter was reltively straight forward with no real issues. I have to say that terraform, after getting more experience on it, has been really fun to write and play with. Its nice that you can have all of the infrastructure set up in code so that it is easily reproducable. This is useful for an avid homelaber like myself, so having the ability to setup quick labs that I can pass off to my friends to try out is super cool. No hassle, no fuss. Just the way I like it.
Next up in the series, I’ll be going over Ansible and how to integrate it with Terraform for a quick and easy lab. Stay tuned and thanks for reading!